Every "Soldering Kit" from the Evil Mad Scientist includes all parts and components necessary to assemble the product, along with clear and detailed instructions. (Most kits include printed instructions, but we are slowly moving towards electronic documentation.)
Basic electronic soldering skill is presumed, but no further knowledge of electronics is required or expected. Our goal is that you can have fun building our kits whether or not you happen to know Ohm's law, the resistor color code, or how to read a schematic diagram.
Tools
You will need three basic items to build our kits: A soldering iron, solder, and small flush clippers--more about these below. For some of our kits (like Meggy Jr RGB) it is also necessary to have a set of small pliers (e.g., needlenose).
 1. Soldering iron. You need a basic soldering iron that was designed for electronics assembly, with a reasonably fine point tip. We recommend one of this design-- a "pencil shape" soldering iron (not gun!) with a base that holds the iron and a wet sponge. This particular iron is a medium-high end workhorse from Weller; you do not need quite one this fancy.
On the other hand, the iron that you use does make a big difference in how long it will take you to build a kit. (Seriously. If you use one that is old and broken, or if you go with an ultra-low-end $10 iron, please expect our kits to take you at least twice as long to assemble.) Our recommendation for a low-cost iron: WLC100 by Weller, about $40.
 2. Solder. Fine solder meant for use with electronics. We recommend rosin-core solder, 0.020" in diameter (or within a factor of two of that). Either lead-based or newer lead-free solder will work well with our kits.
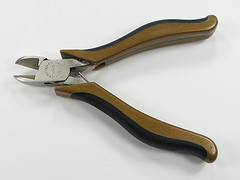
 3. Small flush clippers. Also known as angle clippers. Small, hand-held type that can easily cut the leads of wires and LEDs. You'll use these a lot, so comfort counts. Shown here, one of our favorites-- Sears Craftsman brand.
Some other tools that could be helpful if you happen have them and you know how (and when) to use them: resistor lead bending tool, wire strippers, desoldering braid or pump, multimeter, oscilloscope.
If you're learning to solder, or want to brush up your skills, this classic video is clear and excellent. Another useful resource is the Soldering is easy comic book, which is available in many translations.
